


Trezor Hardware Wallet Review

If you are reading this, you are most likely looking to buy a new hardware wallet and are looking for opinions on different models. Well, you have found the right place for that! Here’s an extensive guide featuring everything you know to know about the Trezor Hardware Wallet.
Trezor is owned by SatoshiLabs and has currently 2 main products. Trezor One and Trezor T. Both models are pretty similar both in design and functionalities but there are a couple of differences regarding security in both of them.
Apart from the crypto wallet, these devices can also be used as password managers.
The Trezor web wallet
Trezor offers a web-based wallet interface for its devices. It’s not compulsory to use it, and there are some alternatives that we’ll be seeing a bit later, but it does make things easier. You access the web-based wallet from wallet.trezor.io, and the site will ask you to install Trezor Bridge; which can be compared to the drivers necessary for the device to be recognized by the browser and other applications you may use your device with.
Getting started
Once Trezor Bridge is installed and your device is connected to the computer, you’ll see the Landing page of the web-based wallet.
If you click the “Bitcoin” tab on top of the page, a scroll-down menu with different supported altcoins will show. You can select either and its wallet will show up. Every wallet except for Ethereum works the same way on this web client.
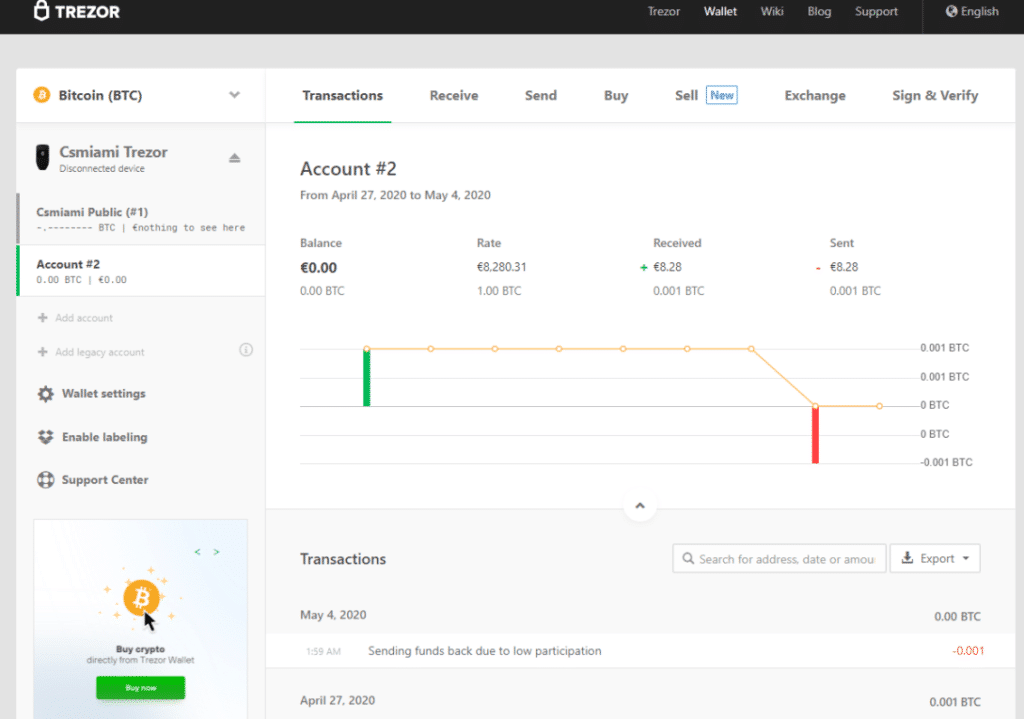
Below that, you can see an “Account”. Every account is a wallet with a separate set of addresses within the device, all of them have been created from the same seed, so recovering them in case there’s a problem with the device should be easy enough. You can create as many wallets as you want, but you have to use it at least once in order to be able to create a new one. The default accounts on Trezor are Nested Segwit (addresses starting with 3…..), but you can create Legacy accounts too (addresses starting with 1….).
Below that, you’ll see the wallet settings, which are used to set your local fiat currency, and the block explorer that will be used. You can set these parameters for different coins. The “Enable Labeling” feature will connect your hardware wallet with a dropbox account so that you can label the addresses and transactions. You need to have the device connected in order to do this, and every time you plug it in, it will ask you whether you want to enable labeling or not. Lastly, the support center; which hopefully, you’ll never have to visit.
Trezor Wallet Functionalities
Next to the Bitcoin (or the altcoin you are using) icon, you’ll see some features the web client offers. As in any normal wallet, you’ll be able to access the receiving addresses, create a transaction, see an overview of the wallet history, and sign and verify messages. On top of that, Trezor offers the Buy, Sell and Exchange functionalities; which are pretty much what you would expect them to be; to buy, sell and exchange crypto.
There’s not really much to say about the default features. For obvious reasons, the device has to be plugged in to send a transaction (to authorize it), and the same goes for signing and verifying signatures. The receive tab does not need the device to be connected tough; you can see the receiving addresses without the device being connected but unlike with accounts, you can see the next address before using the last unused one. This only works once though, and you can see the 3rd address without using the 2nd. It is recommended that the device is plugged in whenever you want to see a new address because you can double-check the address that you are seeing on your computer screen with the one your Trezor device is showing. You can still see the new addresses with no verification, but it’s not as safe as double-checking, and one of the main reasons to buy a hardware wallet, is security. Addresses can be labeled here too so that every incoming transaction will show that tag in the wallet overview.
Sending crypto with Trezor
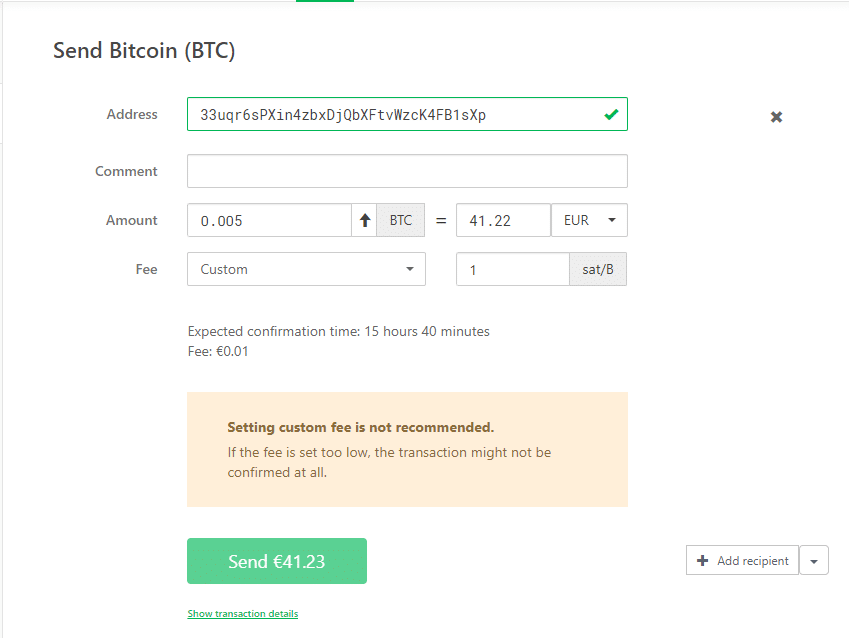
Creating transactions on the Trezor web wallet is pretty easy too. You input the address you want to send the coins to, add an optional tag about that transaction; input the amount you want to send, either in BTC (or altcoin) or in Fiat, and lastly, select the transaction fee. When you are done, simply click send, and verify the data on your device before authorizing the said transaction.
There’s not much to say about this web client, other than that you can customize the trezor homescreen, to show a certain image when it’s connected. Apart from that, you can see the xPubs from the device tab, select a PIN for the device, label it; and most importantly, in the Advanced tab; you can choose to use a passphrase for the device. The advantages of using a passphrase can be read here, and to finish with this section, you can also check your recovery seed and wipe clean your device.
Using Trezor with Electrum
Even if Trezor offers a web wallet, there may be many reasons for a user not to want to use it. One of the best solutions to use your Trezor without their interface is Electrum. Even if you use the web-based client, there are still certain things that can’t be done; so using Electrum is still necessary for some things. How does it work? Well, it’s actually pretty simple.
Setting up
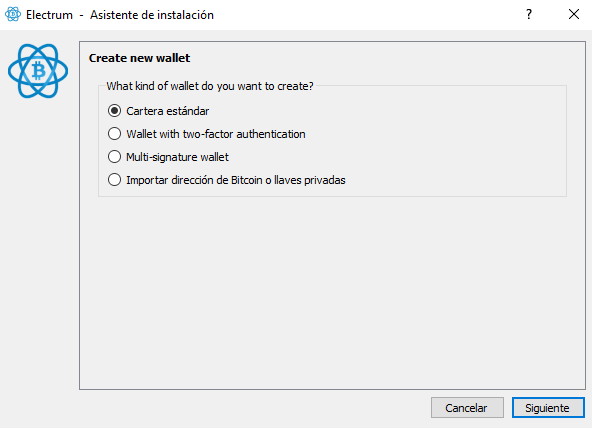
Once you have downloaded Trezor Bridge and Electrum (always from the original source, and verifying the signature of the file), run Electrum. You will see the “Create new wallet” menu, and from the options, you see there, select “Standard wallet”.
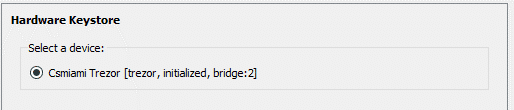
On the next page, select “Use a hardware device”, and Electrum will search for said device. You need to have your hardware wallet plugged in to set it up every time you want to use it. This, for example, doesn’t happen on the web interface, as you can “remember” the device, and you’ll still be able to generate new receiving addresses and see the wallet overview, but unable to create new accounts or send any coin. Electrum will show a list of all the devices it’s found, and as with the web wallet, you will have to input your PIN code (if you are using one).
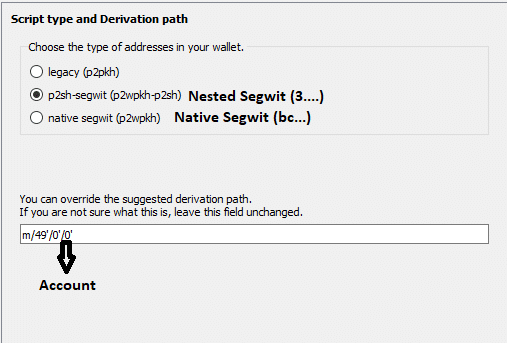
The following step is one of the most important ones in the whole process. You’ll see the following screen (photo) and it’s important you understand what the data means. The white text box shows the derivation path Electrum will use to find the wallet (account), and its addresses. Remember that the default Trezor wallets are Nested Segwit (p2wpkh-p2sh), and if you want to see exactly the same addresses as on the web client (on the 1st account), click on that segwit type, and then next. If you have created another account, you have to change the second 0’ on the derivation path (see photo below). It’s important to know that using Electrum will not let you export private keys. You will also not be able to retrieve the seed from Electrum.
Advantages of using Trezor with Electrum
Now, why would anyone use Electrum with a Trezor device, if Trezor offers a web client and is currently developing an upgrade for it, with an App included (called Trezor Suite). Well, there are actually a couple of reasons for it.
First of all, a web-based client requires….. Yes, you’ve guessed! Internet! Trezor web will not work in an air-gapped computer, whereas Electrum will.
Another important feature that is not available in the Trezor interface is what we call “coin control”. And what is this “coin control” you wonder. Here’s a short explanation for you:
When you create a new transaction on the Trezor client, the client will decide what inputs it will use in that transaction. You can’t decide which inputs or addresses will be used for the transaction, so if you want to specifically use one address (to empty it for example), you can’t just hit a “send all funds” button that will empty that address. Electrum does allow you to choose what inputs to spend on the transaction you are creating.
One last important feature that Electrum offers is the possibility of seeing the change addresses. I remember the first time I sent a transaction that had to split an input in 2, and sent the unspent part to a change address…. which I had never seen! After a thorough search, I could not find that address anywhere in the web client, so I decided to check in Electrum to see if it was a change address and it actually was.
Using Trezor for Ethereum
As I’ve mentioned earlier, Ethereum works in a different way compared to the rest of the supported altcoins in Trezor. When you click on Ethereum, on the Altcoin list, you’ll see a pop-up message asking you which service you want to use: MyEtherWallet, or MyCrypto. Personally, I always use MEW, so that’s what I’ll be explaining. When you click on MEW (or MyCrypto), it’ll open in a new tab. Double-check as usual to avoid phishing. Then, click “Access my wallet” and within the options, you’ll see Hardware Wallet. You’ll see a list of manufacturers, so check the one that belongs to your HW, Trezor in this case, and “continue”. A new tab will open. Follow the instructions on that new tab, and once connected, the tab will close and you’ll be back to MEW. You’ll see a list of addresses; select one, accept the terms and hit the “Access my Wallet” button. Now, this is a tricky part (or buggy I must say). Once you accept, you will still see the Hardware Wallet manufacturer list, so you might think that you’ve done something wrong and have to repeat the process. Well, stop right there and check on the top right corner of your screen!
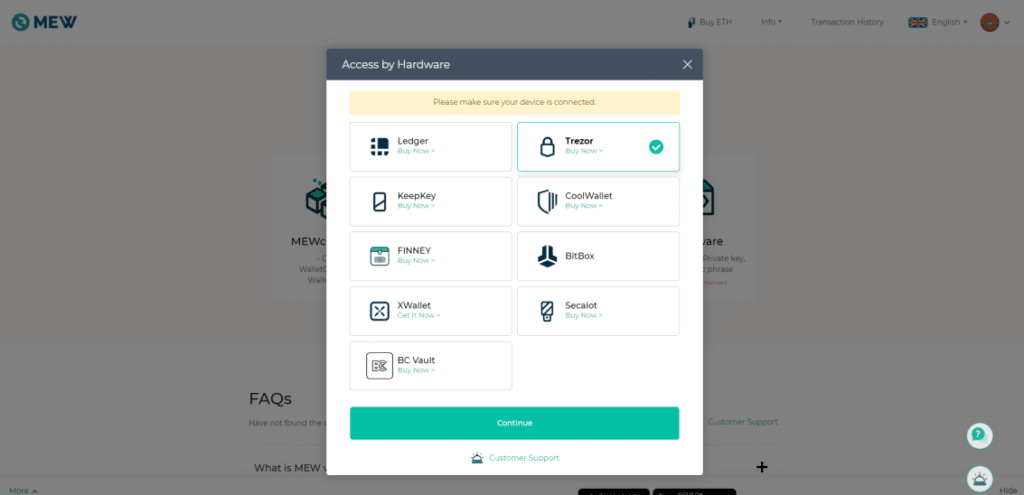
If you can see a circle on the top right of your screen in the background, you can simply close the manufacturer list; you are already logged in to your account and can operate from there.
That’s it – we hope you found this Trezor Hardware Wallet guide helpful.
Relevant news

Halving is coming
It's really been a while since I have been on this side of the screen,…
The Best Crypto Wallets for Gambling Online in 2023
Across different industries, cryptocurrencies have had a major influence over the last decade. The decentralized…
Different types of Bitcoin Wallets
As some of our most veteran readers may remember, there was a time in which…
Trezor and Taproot
It's already been a few months since the Taproot protocol was implemented into the Bitcoin…
Bitcoin/Crypto Wallets Used for Gambling
So, you have some bitcoin and you want to gamble, but how do you get…
The Blockchain
If you have spent more than a few minutes looking into cryptocurrencies, and even if…
1 thoughts on “Trezor Hardware Wallet Review”
Login
Register